I did it for 64x64x3 size images in HPC. In Conditional QGAN, you also give a condition along with the latent.

So here we put a label |y> along with latent vector |z>.
I did it for 64x64x3 size images in HPC. In Conditional QGAN, you also give a condition along with the latent.
So here we put a label |y> along with latent vector |z>.
![]() data_tot.zip
data_tot.zip![]()
The result with 64x64x3 images, 13 qubits, 2 depth, 3 generators, 1 ancilla and your dataset, is a failure for me. I used the code that you posted in the previous mail. Maybe the problem is that you are using HPC while I can’t use it. Anyway, can you try with my dataset of Dilbert comics and give me the result? It is important for my thesis understanding if the code works with my dataset. I attached the full dataset (13000 images). Waiting for your reply, thank you.
Ya sure, I will try and send the results to you. May be you can try with different batch sizes? Also I was thinking may be should change different weight initialization as our weights are same used for greyscale images. As you know in DCGAN, we kind of initialize the weights. Just try doing this by the time I send you the results of QGAN.
Also can you give me access to your google drive dataset. I have already send the request.
yes I give you the access to the dataset, you have to train 64x64 images (not 8x8 because they are too small for a good resolution). Thank you in advance, and I hope the code will work also with my dataset on HPC. Meanwhile I am doing another test changing the batch size. The weights for qgan are defined in this part of code, where the quantum circuit was implemented. The weights are initialized with shape depth x n.qubits, so in our case for instance 4 x 13 (for the gan with 3 sub generators). In order to change the weights, I can define a different number of layers (depth), but I can’t exceed 3/4 because of the lack of an HPC. A deeper circuit might give better results.
@qml.qnode(dev, interface=“torch”, diff_method=“parameter-shift”)
def quantum_circuit(noise, weights):
weights = weights.reshape(q_depth, n_qubits)
for i in range(n_qubits):
qml.RY(noise[i], wires=i)
for j in range(q_depth):
for y in range(n_qubits):
qml.RY(weights[j][y], wires=y)
for y in range(n_qubits - 1):
qml.CZ(wires=[y, y + 1])
return qml.probs(wires=list(range(n_qubits))
Can I ask you also if there is a way to simulate an HPC in a standard laptop or on cloud?
Actually, the weights are initialized here:
class PatchQuantumGenerator(nn.Module):
    """Quantum generator class for the patch method"""

    def __init__(self, n_generators, q_delta=1):
        """
        Args:
            n_generators (int): Number of sub-generators to be used in the patch method.
            q_delta (float, optional): Spread of the random distribution for parameter initialisation.
        """

        super().__init__()

        self.q_params = nn.ParameterList(
            [
                nn.Parameter(q_delta * torch.rand(q_depth * n_qubits), requires_grad=True)
                for _ in range(n_generators)
            ]
        )
        self.n_generators = n_generators
So in self.q_params, that’s where weights are initialized. In quantum_circuit function, they are just reshaped from torch.Tensor of size (q_depth*n_qubits) to torch.Tensor of size (q_depth, n_qubits).
def quantum_circuit(noise, weights):

    weights = weights.reshape(q_depth, n_qubits)

    # Initialise latent vectors
    for i in range(n_qubits):
        qml.RY(noise[i], wires=i)

    # Repeated layer
    for i in range(q_depth):
        # Parameterised layer
        for y in range(n_qubits):
            qml.RY(weights[i][y], wires=y)

        # Control Z gates
        for y in range(n_qubits - 1):
            qml.CZ(wires=[y, y + 1])

    return qml.probs(wires=list(range(n_qubits)))
Ok thank you,
Meanwhile you try the qgan with my dataset, I can think about another way to initialize weights.
In previous tests I have also changed delta from 1 to 3 thinking about RGB images so the weights became
3 x random(depth x nqubits), but I didn’t get any improvements.
I am running the code in my HPC. Can you run this and see if you are getting anything.
class PatchQuantumGeneratorRGB(nn.Module):
    """Quantum generator class for the patch method, adapted for RGB images"""

    def __init__(self, n_generators, q_delta=1):
        """
        Args:
            n_generators (int): Number of sub-generators, adjusted for RGB (should be 8 * 8 * 3 for 8x8 RGB).
            q_delta (float, optional): Spread of the random distribution for parameter initialization.
        """
        super().__init__()
        self.q_params = nn.ParameterList(
            [
                nn.Parameter(q_delta * torch.rand(q_depth * n_qubits), requires_grad=True)
                for _ in range(n_generators)
            ]
        )
        self.n_generators = n_generators

    def forward(self, x):
        # Size of each sub-generator output
        patch_size = 2 ** (n_qubits - n_a_qubits)

        # Create a Tensor to hold a batch of images
        images = torch.Tensor(x.size(0), 0).to(device)

        # Iterate over all sub-generators
        for i in range(0, self.n_generators, 3):
            # Create Tensors to hold the color channels for each pixel
            red_channel = torch.Tensor(0, patch_size).to(device)
            green_channel = torch.Tensor(0, patch_size).to(device)
            blue_channel = torch.Tensor(0, patch_size).to(device)

            for elem in x:
                red_out = partial_measure(elem, self.q_params[i]).float().unsqueeze(0)
                green_out = partial_measure(elem, self.q_params[i + 1]).float().unsqueeze(0)
                blue_out = partial_measure(elem, self.q_params[i + 2]).float().unsqueeze(0)

                red_channel = torch.cat((red_channel, red_out))
                green_channel = torch.cat((green_channel, green_out))
                blue_channel = torch.cat((blue_channel, blue_out))

            # Combine the color channels and add to the images tensor
            combined_patches = torch.cat((red_channel, green_channel, blue_channel), 1)
            images = torch.cat((images, combined_patches), 1)

        # Reshape to form RGB images (8x8x3)
        images = images.view(x.size(0), 8, 8, 3)

        return images

# Usage
# generator_rgb = PatchQuantumGeneratorRGB(n_generators=8*8*3).to(device)
# rgb_images = generator_rgb(input_tensor)  # input_tensor should be your input data
I don’t know how good it will be. n_qubits = 5, n_a_qubits = 1, q_depth = 6.
@isaacdevlugt and @CatalinaAlbornoz , which takes more time for computation (1 ancillary qubit) :
13 total qubits with 3 sub-generators or
9 qubits with 48 sub-generators
to create 64x64x3 RGB images on NVIDIA A100-SXM4-40GB ? Number of images = 18770.
I applied this code with the combination of the three channels.
I don’t understand where I have to use this line because the input of the generator is the noise, not the images: # rgb_images = generator_rgb(input_tensor)
If I use generator_rgb as my netG, there is a problem when I run this part:
noise = torch.rand(b_size, n_qubits, device=device) * math.pi / 2
fake_data = netG(noise)
because the output of the generator is: images = images.view(x.size(0), 8, 8, 3), while the input is the noise that has a different size.
If I cancel the line images = images.view(x.size(0), 8, 8, 3), so the output of the generator is:
images = torch.cat((images, combined_patches), 1)
But there is a problem now with the discriminator at this point because fake_data from generator has different size from the input of the discriminator:
outD_fake = netD(fake_data.detach()).view(-1)
Error: mat1 and mat2 shapes cannot be multiplied (1x3072 and 192x64)
I am thinking about how to solve this problem.
How are the results from the HPC training of Dilbert comics dataset?
Yes the images are forming, I can’t achieve this result by using my computer. Maybe it requires more epochs than 50 for good results. Can you continue the training?
Thank you, if you can go on training, you are saving my university thesis, because if we reach better results, I can say that quantum GAN for RGB images of Dilbert comics works only by using HPC, and this demonstrates that the code and the training is correct. So, I can compare standard GAN with quantum GAN results. My supervisor wants me to use this dataset.
I will try doing more than 50 epochs. However it took too many hours. I think we may have to do something about it. We have to ask someone else who knows why it is taking so long for qgan as compared to dcgan for RGB images? You can also used celeba dataset, the one used in PyTorch tutorial and cross check if you want.
ok Thank you, I hope after another 50 epochs we will gain better results.
The problem is that I don’t understand why the training is too slow with this dataset compared to the dataset with the geometric forms.Maybe Dilbert comics are more complex images. Meanwhile I can try running the qgan with the celeba dataset in order to test if it gets the same result.
I think that standard DCGAN is more performing than QGAN, maybe because quantistic circuits are not so appropriate for image generation networks.
I found this link for an HPC simulator, but I don-t know if it works…I will try. https://accasim.readthedocs.io/en/latest/users/index.html
After the training (500epochs) with celeb face dataset, (13 qubits, 3 generators, 3 depth), did not appear any images as output. So, the problem is not the dataset, but the hardware used for the training. A standard laptop or home computer can produce results only with small images 8x8, greyscale with simple representations as handwritten digits, although bigger images (64x64) or RGB or complex images such as celebrity faces dataset and dilbert comics dataset require an HPC.
I am reading these articles about the comparison between quantum and standard machine learning algorithms. There are some advantages in some ML fields, but maybe in GAN there aren’t.
https://arxiv.org/pdf/2203.01340.pdf
https://www.nature.com/articles/s43588-022-00311-3
https://www.nature.com/articles/s41534-017-0017-3
https://pennylane.ai/blog/2022/03/why-measuring-performance-is-our-biggest-blind-spot-in-quantum-machine-learning/
Moreover, I tried to build the GAN also with qSkit library, but the example here is not dedicated to images: https://qiskit.org/ecosystem/machine-learning/tutorials/04_torch_qgan.html
Did you reach better results after another 50 epochs with my dataset on HPC? What kind of HPC are you using in terms of hardware characteristics?
Hey try this one:
PS: The above code is for image_size = 32 and batch_size = 16.
# Quantum variables
n_qubits = 9  # Total number of qubits / N
n_a_qubits = 1  # Number of ancillary qubits / N_A
q_depth = 2  # Depth of the parameterised quantum circuit / D
n_generators = 4 # Number of subgenerators for the patch method / N_G

# Quantum simulator
dev = qml.device("lightning.qubit", wires=n_qubits)
# Enable CUDA device if available
device = torch.device("cuda:0" if torch.cuda.is_available() else "cpu")

@qml.qnode(dev, diff_method="parameter-shift")
def quantum_circuit(noise, weights):

    weights = weights.reshape(q_depth, n_qubits)

    # Initialise latent vectors
    for i in range(n_qubits):
        qml.RY(noise[i], wires=i)

    # Repeated layer
    for i in range(q_depth):
        # Parameterised layer
        for y in range(n_qubits):
            qml.RY(weights[i][y], wires=y)

        # Control Z gates
        for y in range(n_qubits - 1):
            qml.CZ(wires=[y, y + 1])

    return qml.probs(wires=list(range(n_qubits)))


# For further info on how the non-linear transform is implemented in Pennylane
# https://discuss.pennylane.ai/t/ancillary-subsystem-measurement-then-trace-out/1532
def partial_measure(noise, weights):
    # Non-linear Transform
    probs = quantum_circuit(noise, weights)
    probsgiven0 = probs[: (2 ** (n_qubits - n_a_qubits))]
    probsgiven0 /= torch.sum(probs)

    # Post-Processing
    probsgiven = probsgiven0 / torch.max(probsgiven0)
    return probsgiven


class PatchQuantumGenerator(nn.Module):
    """Quantum generator class for the patch method, adapted for 64x64 RGB images"""

    def __init__(self, n_generators, q_delta=1):
        """
        Args:
            n_generators (int): Number of sub-generators, adjusted for RGB (should be 32 * 32 * 3 for 32x32 RGB).
            q_delta (float, optional): Spread of the random distribution for parameter initialization.
        """
        super().__init__()
        self.red_params = nn.ParameterList([nn.Parameter(q_delta * torch.rand(q_depth * n_qubits), requires_grad=True) for _ in range(n_generators)])
        self.green_params = nn.ParameterList([nn.Parameter(q_delta * torch.rand(q_depth * n_qubits), requires_grad=True) for _ in range(n_generators)])
        self.blue_params = nn.ParameterList([nn.Parameter(q_delta * torch.rand(q_depth * n_qubits), requires_grad=True) for _ in range(n_generators)])
        self.n_generators = n_generators

    def forward(self, x):
        # Assuming each sub-generator contributes to one RGB pixel
        patch_size = 2 ** (n_qubits - n_a_qubits)
        batch_size = x.size(0)

        images = torch.Tensor(batch_size, 0).to(device)

        for color_index, color_params in enumerate([self.red_params, self.green_params, self.blue_params]):
            for patch_index, params in enumerate(color_params):
                patches = torch.Tensor(0, patch_size).to(device)
                for elem in x:
                    q_out = partial_measure(elem, params).float().unsqueeze(0)
                    patches = torch.cat((patches, q_out))

                # Each batch of patches is concatenated with each other to create a batch of images
                images = torch.cat((images, patches), 1)

        return images

generator = PatchQuantumGenerator(n_generators).to(device)

print(generator)

# Classical Discriminator
class Discriminator(nn.Module):
    def __init__(self):
        super(Discriminator, self).__init__()
        self.model = nn.Sequential(
            nn.Linear(image_size * image_size * 3, 64),
            nn.LeakyReLU(0.2),
            nn.Linear(64, 16),
            nn.LeakyReLU(0.2),
            nn.Linear(16, 1),
            nn.Sigmoid()
        )

    def forward(self, x):
        x = x.reshape(int(b_size), -1)
        return self.model(x)


# Initialize discriminator
discriminator = Discriminator().to(device)

print(discriminator)
My HPC device is: NVIDIA A100-SXM4-40GB
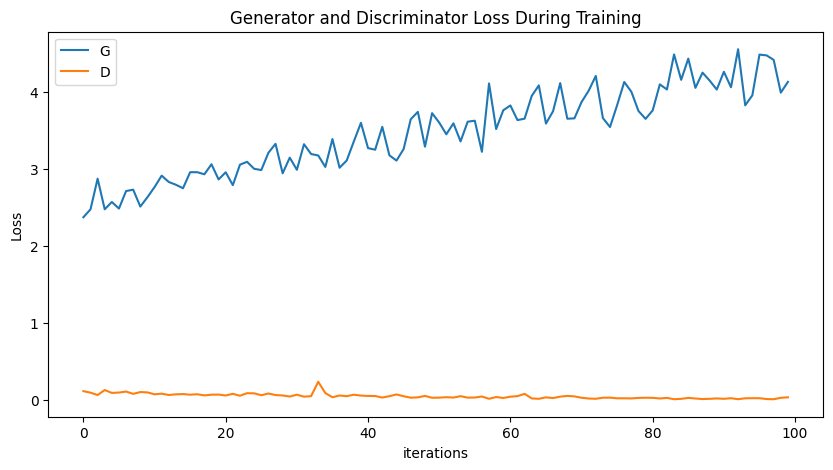
ok, now the model works and the training is complete, but the output is still the same. Unfortunately, the images did not have any improvement also with this generator. The loss trend: for the discriminator decreased and for the generator increased, using learning rate 0,0002 and Adam. Maybe, this is not the solution…
Figure: loss after 100 epochs
Figure: loss after 200 epochs
Did you find better results with HPC after further iterations training? It seems the only way to reach good images…
yess very good, the images are clear, thank you for the help. So the quantum GAN is comparable with a standard dc-gan in output images, but the difference is that the quantum GAN for RGB and big images can be run only on HPC. So, the network with 9 qubits and 48 generators for 64x64 images works very well on HPC. Are the losses of G and D stable? In this case they did not occur in a barren plateau. It remains the issue why this kind of GAN can be run only on HPC? We tested that the qgan with 13 qubits and 3 generators is not efficient enough to obtain the output. Although, using more subgenerators is not possible on standard computers because it requires more hardware resources. The only solution for running a quantum gan on standard computers is changing totally the structure of the circuit: for instance not using patch quantum generators, but another kind of architecture. I tried converting one or two torch layers of a standard linear or convolutional generator in quantum layers but without success. If we find a new solution, we’ll keep in touch.
Hi @mass_of_15, your results are amazing! Congratulations!
@Eleonora_Panini, it’s normal for some problems to be so hard that they can only be solved on HPC or on actual quantum computers. This motivates the need for quantum computers in the first place! Of course if you can find additional ways of making the simulation more efficient then you may be able to run it on smaller machines.
Yes in order to run the model with RGB images or with bigger size (64x64) or more complex figures images a quantum computer is necessary.
We made a lot of attempts to adapt the model for standard computers, for instance modifying quantum parameters, generator, discriminator, learning rate, optimizers,number of qubits, depth… but without any results.
I can run on my PC only the demo with handswritten dataset of grayscale images 8x8.
I don’t have any other idea…do you have other suggestions?